Museum and gallery lighting design needs to make exhibits clearly visible, control color and reflections, and limit the light each object receives. This guide covers choosing lux levels, calculating display time, and commissioning luminaires and controls. Guidance from reference documents is clearly distinguished from illustrative calculations.
Good museum lighting starts with the object and its display time
Visitors need to see details and colors, while the museum needs to limit cumulative light damage. Good design therefore starts with material sensitivity, display duration, color quality, beam control, and viewing positions, rather than a single answer to “how many lux?”
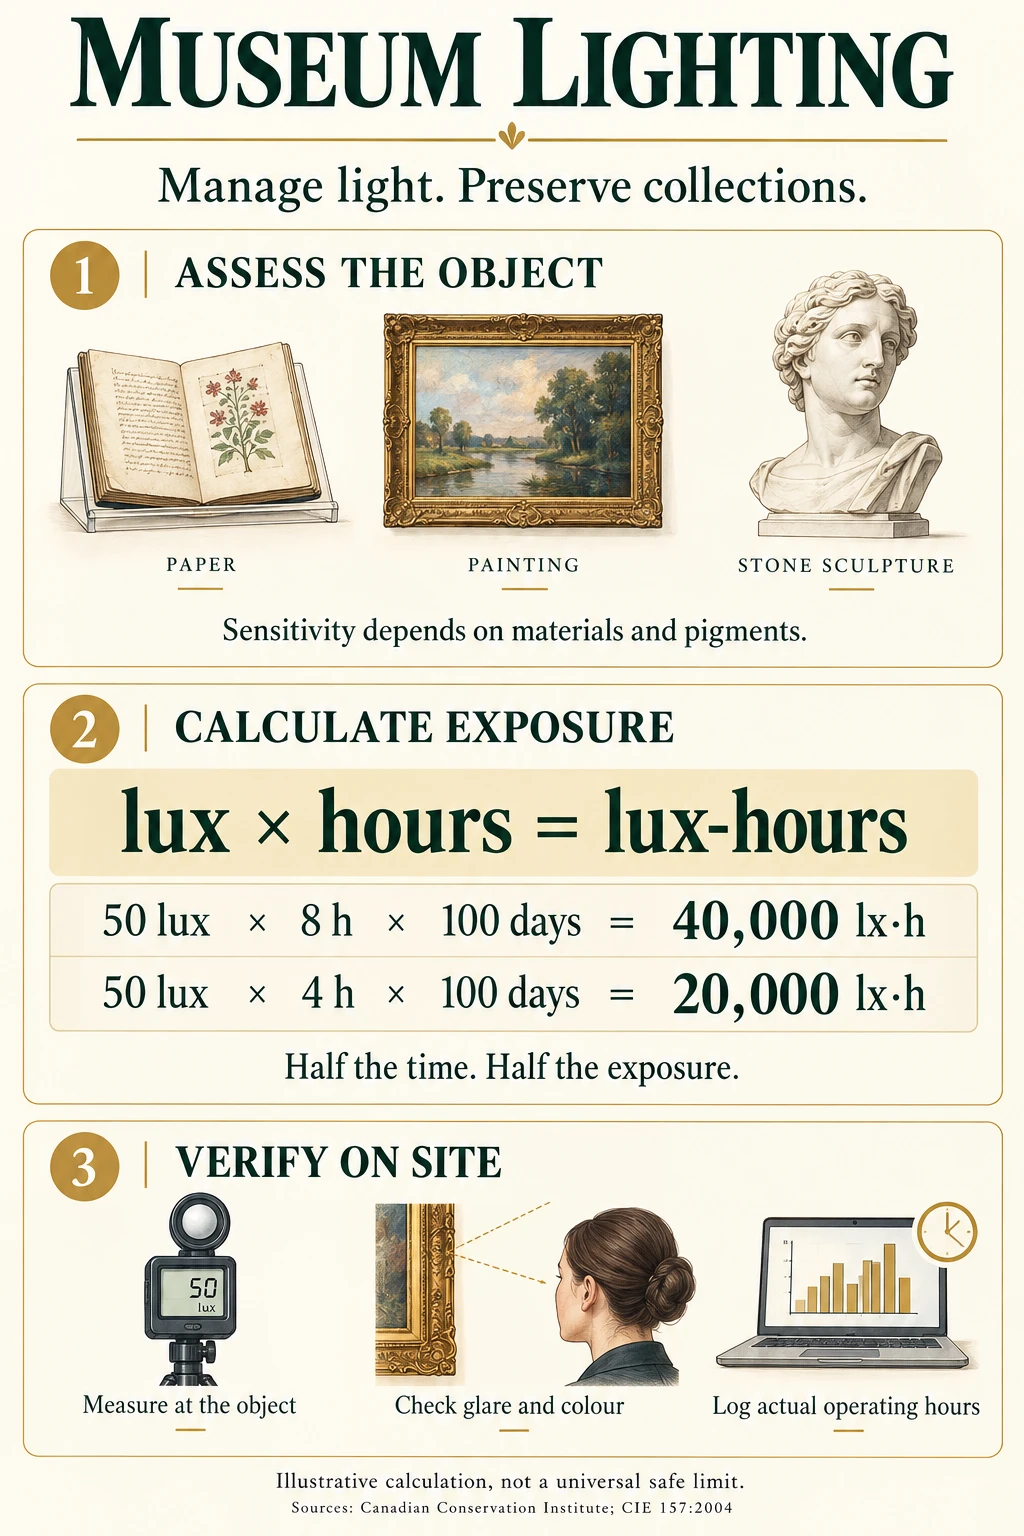
Lighting that makes an exhibition look attractive on opening day may accelerate fading over time, and most light damage is irreversible. The key concept is Light Dose = Illuminance × Time. Reducing operating hours can reduce exposure while keeping the same lux level during viewing.
Classify objects by light sensitivity first
| Sensitivity group | Examples | Starting approach |
|---|---|---|
| High sensitivity | Paper, watercolors, color photographs, textiles, feathers, and natural dyes | Around 50 lux is often considered as a starting point, together with limits on display hours. Resting objects in darkness does not restore faded colors. |
| Moderate sensitivity | Oil and acrylic paintings, wood, leather, and painted furniture | Traditional guidance often uses around 150 lux, but pigments, condition, and exposure history must be considered. |
| Low sensitivity | Stone, metal, ceramics, and glass without light-sensitive components | Higher levels may help reveal form and texture, but mixed-material objects may contain vulnerable components. |
The Canadian Conservation Institute (CCI) explains that traditional guidance uses 50, 150, and 300 lux for different material groups. A more appropriate management approach considers each object’s sensitivity and the acceptable rate of fading, while tracking exposure in lux-hours or megalux-hours.
How to calculate light dose and display time
Cumulative light exposure (lux-hours) = illuminance at the object’s surface × exposure hours. If the light level changes during the day, calculate each interval separately and add the results. This supports display planning; it is not a universal fading prediction formula for every pigment or light spectrum. [1]
| Lighting schedule | Calculation | Cumulative exposure |
|---|---|---|
| 8 hours per day | 50 × 8 × 100 | 40,000 lux-hours |
| 4 hours per day | 50 × 4 × 100 | 20,000 lux-hours |
In this example, halving the exposure time reduces the dose by 50% while retaining 50 lux during viewing. Include light from windows, cleaning lights, and lighting used before and after visiting hours. Dimming a luminaire to 50% does not necessarily halve the lux measured on an object, so verify the result on site.
Planning from an approved exposure budget: suppose a conservator approves 30,000 lux-hours for this display period, and 10,000 lux-hours have already been used. The remaining budget is 20,000 lux-hours. At 50 lux, this allows 400 hours, or 50 days at 8 hours per day. This budget is invented solely to explain the calculation; it is not a standard value to apply directly to real objects.
Low lux does not always mean poor visibility
Visibility depends on contrast, detail size, background color, visual adaptation, and visitor age. CCI describes 50 lux as a historical benchmark that still allows color vision. Older visitors, dark objects, and low-contrast details may require additional support. Raising the lux on an object is not always necessary: reduce distracting light, adjust wall colors, enlarge labels, or provide a transition zone so visitors’ eyes can adapt before entering a dim gallery.
Control glare and reflections before increasing power
CCI recommends flexible track lighting and suggests a starting beam direction of approximately 60° from horizontal to help avoid glare, reflections, and excessive emphasis on texture. Final positions need a mock-up based on ceiling height, eye level, artwork dimensions, and the project’s glazing surfaces.
Select LEDs that render artwork colors faithfully
- CRI alone is not enough: check R9, chromaticity deviation Duv, spectral power distribution, and consistency between luminaires.
- Color must remain stable: choose appropriate binning and check color changes during dimming.
- Dimming should be deep and stable: check flicker at actual operating levels and test banding with cameras used in the exhibition.
- Optics should be adaptable: consider interchangeable lenses, shutters, snoots, honeycomb accessories, and framing projectors to suit different exhibitions.
- Plan for maintenance: record driver and module models, settings, and spare parts to preserve color consistency after replacement.
CCI Technical Bulletin 36 recommends museum LEDs with CRI above 90, R9 above 50, and Duv between −0.003 and +0.003. For higher color quality, it also suggests R9 above 90. LEDs do not remove the basic conservation requirement: damage remains related to illuminance and exposure time.
Choose CCT using real objects and viewing conditions
“Warm white” is not evidence that a luminaire will always protect artwork better. Correlated color temperature describes the tone of white light, not the object’s susceptibility to damage. Start with dimmable luminaire samples and compare the actual works at equal lux levels. Check whites, reds, dark colors, and surrounding wall colors before choosing the exhibition’s color temperature. [2]
Information to request from suppliers before purchase
- CRI, R9, CCT, and Duv reports for the proposed model and power rating, with spectral data where needed.
- IES/LDT photometric files and lens samples for trials at the actual throw distance.
- The dimming range achievable with the installed drivers and control system.
- Shielding accessories, replacement parts, and information on color consistency when additional luminaires are purchased.
Daylight is possible, but difficult to control
Daylight connects visitors with the architecture and the outdoors, but its level, direction, color, and thermal contribution can change rapidly. Use blinds, louvers, UV-filtering glazing, and daylight sensors, and map exposure over the year. Keep direct sunlight off organic collection objects.
Lighting controls can reduce dose while preserving the visitor experience
- Dim or switch off display lighting when no visitors are present, using smooth fades.
- Provide separate scenes for viewing, cleaning, exhibition installation, photography, and emergencies.
- Lock maximum levels by zone to prevent an incorrect scene from exceeding the intended output.
- Log operating hours and dimming levels to calculate lux-hours for important objects.
- Combine visitor sensors with lighting schedules. Check that display lights really switch off after closing without affecting circulation or emergency lighting.
Commissioning: check the lighting before the exhibition opens
Create an object-by-object register recording the object ID, most sensitive material, approved lux level, lighting hours, and responsible person. Measure in the same plane as the object’s surface without touching it, and avoid casting shadows with the meter operator’s body. Where daylight is present, collect readings at several times. One nighttime reading cannot establish the total daily exposure.
Pre-opening checklist
- Measure lux at the actual object surface, rather than on the floor or with the meter held away from the work.
- Measure several points on large works and record minimum and maximum readings.
- Check UV where daylight or potentially UV-emitting sources are present.
- Inspect reflections from several visitor heights and viewing angles.
- Evaluate surface colors using actual material samples, not renderings alone.
- Test dimming, scenes, sensors, fade times, and behavior after a power failure.
- Photograph aiming positions and record the lens, beam angle, and dimming setting.
- Hand over exposure logs and define repeat-measurement requirements when exhibitions change.
Common mistakes
- Setting lux by room type: classify objects individually rather than applying one value across the gallery.
- Reducing lux but leaving lights on continuously: dose continues to accumulate with time. Use schedules and presence controls.
- Focusing on UV and forgetting visible light: even after UV is filtered out, visible light can fade sensitive colors.
- Stopping at CRI 90: sources with the same CRI can render reds, wood, and pigments differently.
- Aiming only from a ladder: check from visitors’ eye levels and assess the room as a whole.
Frequently asked questions about museum lighting
How many lux should a museum use?
There is no single value for an entire building. Traditional guidance begins around 50 lux for light-sensitive materials and 150 lux for some more resistant groups. Each object’s pigments, mixed materials, condition, exposure history, and display time must be considered. Even 50 lux can cause cumulative damage to sensitive materials.
Do LEDs eliminate the risk of fading?
No. Although many LEDs emit little UV, visible light can still fade certain colors. Review the luminaire data and control both lux and exposure time.
Can resting objects in darkness restore their colors?
No. Darkness does not reverse fading. Rest periods and object rotation help by reducing further exposure. Keep a continuous exposure history rather than resetting the damage record at the start of each year.
Can floor-level lux measurements replace measurements at the artwork?
No, not when assessing an object’s exposure. Wall-mounted pictures need measurements in the picture plane. Display cases and sculptures need measurements at several points on the surfaces receiving light, without touching the objects.
Further reading on Lumens Lab
References
- Canadian Conservation Institute — Light, Ultraviolet and Infrared
- CCI Technical Bulletin 36 — LED Lighting in Museums and Art Galleries
- CCI Notes 2/3 — Track Lighting
- CCI — Framework for Preserving Heritage Collections
- Getty Conservation Institute — Guidelines for Selecting Solid-State Lighting for Museums
- CIE 157:2004 — Control of Damage to Museum Objects by Optical Radiation (report scope information)
Thai source reviewed and updated: October 5, 2026. English translation: October 11, 2026. Light levels and exposure budgets must be approved by the curator or conservator responsible for the actual objects.
Scope: this article summarizes conservation publications and lighting planning guidance. Calculation examples are hypothetical. The cover image is a conceptual illustration, not a measurement result or case study from a particular museum.
ทางลัดสำหรับวางแผนแสงสว่าง
เริ่มจากรวมบทความ เลือกเครื่องมือคำนวณ แล้วดูวิธีทดสอบหรือแหล่งเลือกโคมที่เกี่ยวข้อง